Setting Trusses Straight
Setting Trusses Straight
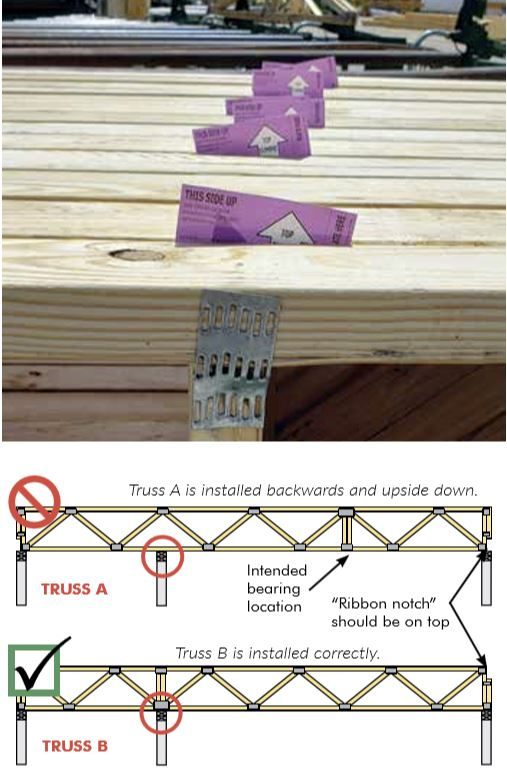
FIGURE B7-4 from the 2018 Edition of the BCSI Book
Trusses are engineered components that will perform as intended if installed correctly. However, those who are installing trusses are not always adept in deciphering truss layout drawings. Even though the truss installers may not be familiar with the design of the truss, steps can be taken to reduce the potential for trusses to be placed upside down or set backwards. By doing a little bit of extra work at the plant, component manufacturers (CMs) can greatly reduce the potential for components to be installed incorrectly.
Depending on the truss design, there may be small differences in a truss that otherwise appears to be symmetrical. These changes can be different plate sizes or an off-center duct chase that are easily missed by those working in the field. Even if a framer is familiar with trusses, it can be very difficult to differentiate trusses that look almost the same but have minor differences. Determining the orientation of bottom chord bearing trusses can be especially difficult due a less defined truss top.
“Framers installing trusses upside down really does happen more than you would think,” says Josh Dermer of American Truss. With Dermer’s Houston, Texas market being primarily floor trusses, their exposure to this issue is likely greater than most. Mid-height and top chord bearing trusses are easier to differentiate the top of the truss from the bottom but can easily still cause issues if reversed.
As mentioned above, trusses do not serve a generic function but are designed for a specific use. While this allows trusses to be somewhat optimized for carrying the load required, it also causes an issue if trusses are installed incorrectly.
A second issue caused by trusses installed incorrectly is that intended loading conditions such as interior bearing points or point loads will not follow the expected load path as designed. Instead of the truss bearing at a panel point, or where a vertical web was located for this specific purpose, the bearing of the incorrectly installed truss may now be taking place in the middle of a panel, bearing on the chord, and compromising the truss’s performance. Therefore, CMs provide a benefit to the building industry by detailing product installation.
CMs can greatly reduce the orientation issues that may arise in the field by employing a few simple tactics during the manufacturing process. Option one is attaching truss tags on trusses to show important features such as this side up, bearing locations, bracing requirements, and point-load locations.
According to Seth Carter, plant manager for Southern Components, Inc. in Shreveport, Louisiana, “it doesn’t take any more time to attach tags but saves us time by reducing RFIs from improperly installed trusses.” By sliding these tags under the plate before the plate is tacked down, CMs will have a highly visible tag that can be read and seen by framers. Option two is marking locations with a wax crayon during manufacturing. This can also provide guidance to framers on proper truss orientation.
One final possibility, which is a method employed by American Truss, is to spray-paint the end of the truss and stamp the bottom chord so framers have a point of reference during installation. As Dermer points out, “it’s harder for those in the field to miss a darkly painted truss end.”
As much work as CMs put into designing trusses that will support the required loads, it makes sense to put in a little extra effort before trusses leave the plant to ensure they are installed as intended at their location and orientation.